Experiment with Ink, Embossing & Watercolour: A Mixed-Media Card with Perfectly Pears
For this week’s Thursday Live, I embraced the spirit of experimentation and played with a technique that had only just popped into my head that morning! Using the Stampin Up Perfectly Pears stamp set, I combined ink blending, embossing, and watercolour into one sweet and rustic mixed-media card.
If you’re based in Port Lincoln, South Australia — or anywhere else in the country — and love learning new ways to elevate your stamping, this tutorial is perfect for you.
The Creative Process (and a Bit of Chaos!)
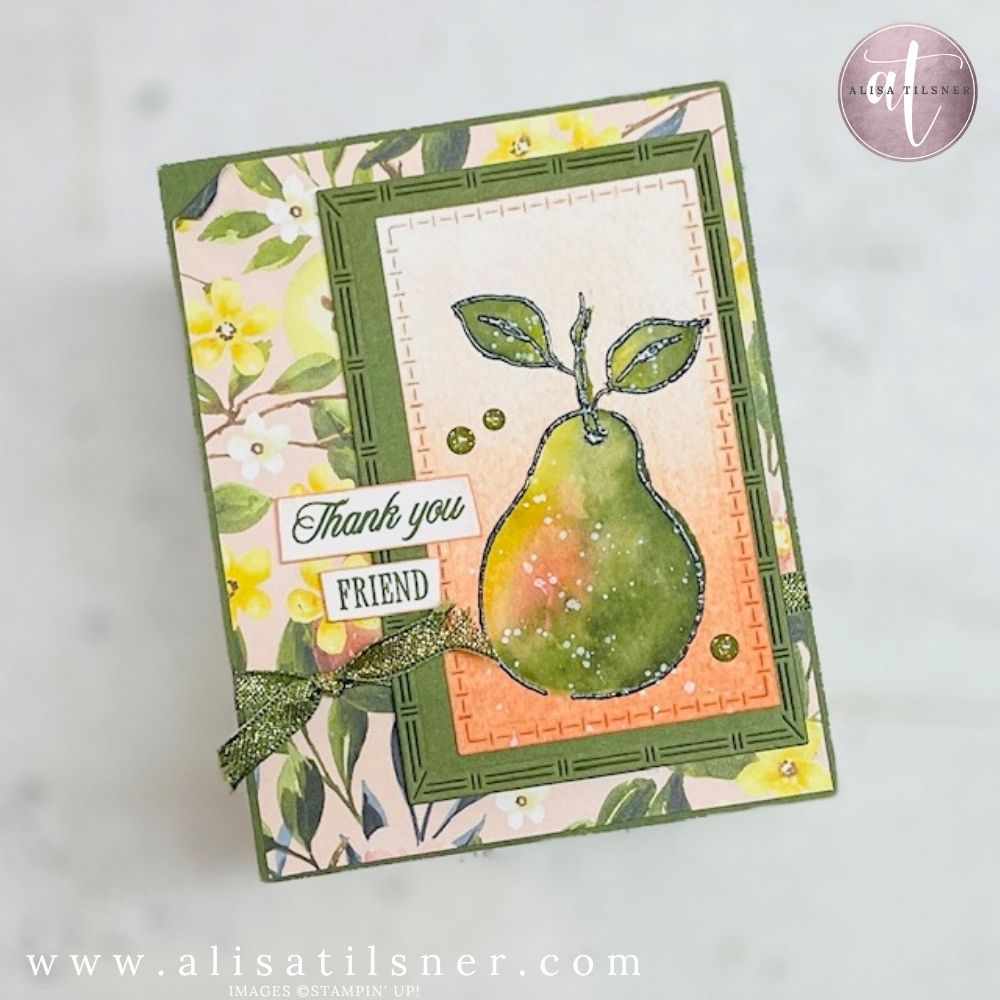
Sometimes creativity begins with “what if?” – and that’s exactly how this card came to life. I started by black heat-embossing the large pear image from the Stampin Up Perfectly Pears stamp set onto Fluid 100 Watercolour Paper. Normally I do ink blending on Basic White, but I decided to see how it would behave on watercolour paper.
I began with Petal Pink ink blending – starting from the bottom of the panel and working in layers to create a soft ombre effect. Using circular motions allowed the ink to feather up the paper and build depth at the base.
Double Stamping & Watercolour
Because StazOn ink isn’t great for photopolymer stamps (and hard to clean), embossing the image gave me both a crisp outline and a waterproof base. Once the ink blending was down, I used the two-step stamps to add colour with Darling Duckling and Mossy Meadow. These inks laid down beautiful colour, but I didn’t stop there.
Enter the water painters!
Using a damp brush, I blended the stamped areas into the ink-blended background, letting colours pool and mix in an intentionally messy way. The stamp’s built-in texture created light and shadow automatically, helping the pear come to life.
For a subtle lift, I added Calypso Coral to the mid-section of the pear, softening the transition from yellow to pink.
Bringing It All Together
Once dry, I flicked on some white ink splatter for that trendy mixed-media look. The result? Soft, rustic, textured layers with a modern twist.
The card base was chosen by popular vote during the live – Mossy Meadow – paired with a busy floral Designer Series Paper that surprisingly didn’t overwhelm the design. I layered a stitched rectangle die cut from the Textured Notes dies, slightly skewed, to keep things casual and creative.
A Mossy Meadow & Gold ribbon knot added texture (frayed for effect!), and I finished with a simple stamped sentiment: “Thank You, Friend”, trimmed on the diagonal. Sparkle Dots in coordinating shades added the final polish.
Try This Technique!
If you enjoy techniques that blend stamping, colouring, and mixed media, this one’s worth a try. It’s perfect for intermediate crafters who want to stretch their creativity without needing a perfectly clean result.
You don’t need to be a watercolour expert — just bring your supplies and a willingness to play.
Supplies Used:
- Stampin Up Perfectly Pears Stamp Set
- Painterly Pears Suite
- Textured Notes Dies
- Fluid 100 Watercolour Paper
- Petal Pink, Mossy Meadow, Darling Duckling, Calypso Coral Inks
- Versamark Ink + Black Embossing Powder
- White Craft Ink for Splatter
- Water Painters
- Stampin’ Cut & Emboss Machine
Get the Tutorial
Want the full list of measurements and step-by-step instructions?
Subscribe to my newsletter HERE to receive this week’s card tutorial straight to your inbox — plus a new one every week!
Whether you’re in Port Lincoln, elsewhere in South Australia, or across the country, I love helping Aussie stampers grow their skills with fresh ideas and fun techniques.
If you’re part of the Creative Card Makers Club, the Perfectly Pears suite will be featured in your August projects — so you’ll be getting even more inspiration soon.
Cheers for now

- Shop my ONLINE STORE
- Join The Artful Stampers Team – Happy Shoppers,
Hobbiest , Part Time and Full Time welcome! - Creative Card Makers Club
- Watch me on YouTube
- Socialise with me on FaceBook
- Email Me