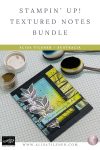
Transform Your Black & White Papers into a Colourful Masterpiece with the Textured Notes Bundle
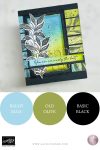
If you’ve ever looked at intense designer series paper and thought, “It’s gorgeous, but how do I use it?” — this is the card for you. This week on my Thursday Live, I jumped back into the creative saddle after a couple of weeks off and crafted a stunning, mixed media-style card using the Stampin Up Textured Notes Bundle. The result? A bold, layered design full of texture, colour, and unexpected flair — all while showcasing the versatility of this dynamic bundle.

Why You’ll Love the Stampin Up Textured Notes Bundle
The Stampin Up Textured Notes Bundle features a stamp set with natural elements, layered shapes, and a coordinating set of dies that go far beyond basic shapes. While the rectangles may look simple, each one has its own decorative edge, making them ideal for layered frames, panels, and focal points on your cards. If you enjoy standalone dies that offer just a little more detail, this is a set worth adding to your collection.
Alongside the bundle, I brought in the Mini Corrugated 3D Embossing Folder — a perfect pairing to amplify the rustic, dimensional style this suite leans into.
Techniques That Bring It All Together
I wanted to shake off the creative cobwebs and push a little further than usual, and this card definitely delivered! Here are a few of the key techniques I used:
1. Ink Blending on Designer Series Paper
I used the black and white DSP from the suite as a base and transformed it with ink blending in Balmy Blue and Old Olive. The textured finish of the DSP gives a unique, slightly uneven colour absorption — which actually adds to the grungy, artistic vibe. And when these two shades meet in the middle? You get a stunning soft teal tone that just glows.
2. Corrugated Embossing with a Twist
To add dimension inside the die-cut frame, I ink blended a separate panel and ran it through the corrugated embossing folder — but with a surprise angle twist. The horizontals add unexpected movement to the design, drawing the eye in toward the centre.
3. Gold Embossed Splatter for Extra Luxe
Here’s where things got a bit messy — in the best way. I watered down Multipurpose Liquid Glue and splattered it across the blended layers, then heat embossed it in gold. The result? Dramatic, shimmering texture that elevates the whole project.
4. Pops of Colour on Black Die-Cuts
Using Old Olive and Balmy Blue Stampin’ Blends, I gently added colour onto black stamped foliage, leaving a white outline for contrast. It adds colour without overpowering the design and balances beautifully with the bold black frame.
5. Twisted Gold Thread Behind the Sentiment
To finish it off, I created a loopy flourish of gold thread behind the sentiment, which was stamped in black on white, layered onto black cardstock, and die-cut. The sentiment sits proudly on a dimensional frame, nestled between the foliage.

This Project Packs a Punch
This card is a perfect example of how a bold background, paired with thoughtful layering and detail, can turn a flat piece of designer series paper into something totally unexpected and beautiful. The Stampin Up Textured Notes Bundle is ideal for crafters who want to explore ink techniques, embossing, and more detailed compositions. Whether you’re designing for birthdays, thank yous, or just an arty note, this set adapts beautifully.
And yes, the instructions for this card — along with all cards created during my Lives — are sent out via my weekly newsletter. Make sure you’re subscribed HERE to get your copy.
Don’t Miss This!
If you’re in Australia, make sure you’ve opted into Stampin’ Up!’s brand-new Stampin’ Rewards Program. Now, with every order over $35 AUD, you’ll earn 10% product credit to use on future orders. Just log into your online account and opt in to start collecting.
Ready to get inky and create something bold? Grab the Textured Notes Bundle, your blending brushes, and a little courage — you might just surprise yourself.


Cheers for now!

- Shop my ONLINE STORE
- Join The Artful Stampers Team – Happy Shoppers,
Hobbiest , Part Time and Full Time welcome! - Creative Card Makers Club
- Watch me on YouTube
- Socialise with me on FaceBook
- Email Me